


Save money and get better results by taking your passport photos at home. In this guide, you’ll learn exactly how to take passport, visa, or ID photos at home without any studio equipment. While you likely know the basics—neutral expression, facing the camera, etc.—we’ll focus on often-overlooked techniques that make the difference between amateur and professional-quality results.
For more information on passport photo requirements, check your local government’s official website.
Let’s get started!
Avoid face distortion: the one-meter (three-feet) rule
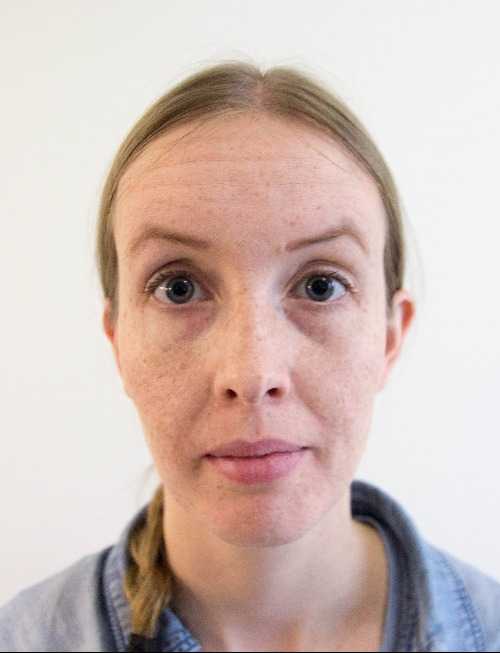
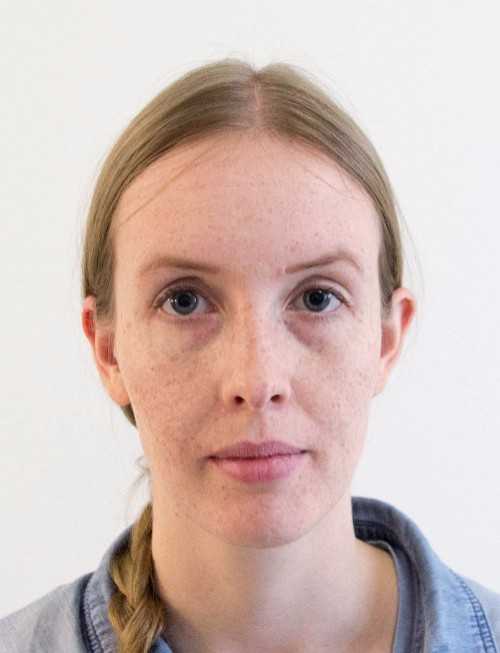
The most common mistake in passport photos is taking them from too close—like a selfie. A typical selfie distance of 40-50 cm (15-20 inches) is far too short and will distort your facial features.
(Click here to close the animation if it distracts you.)
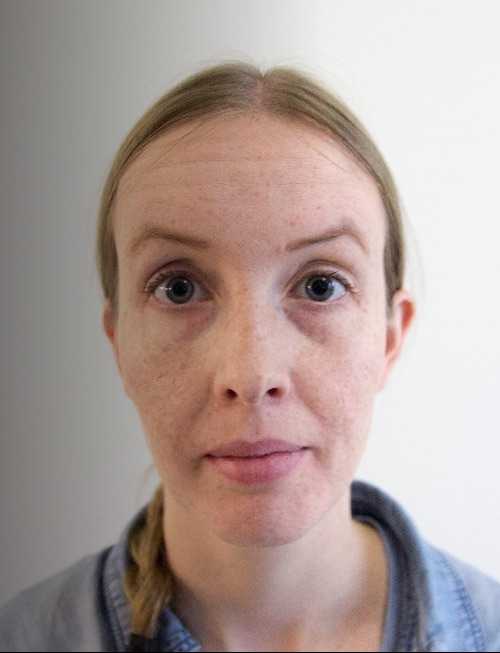
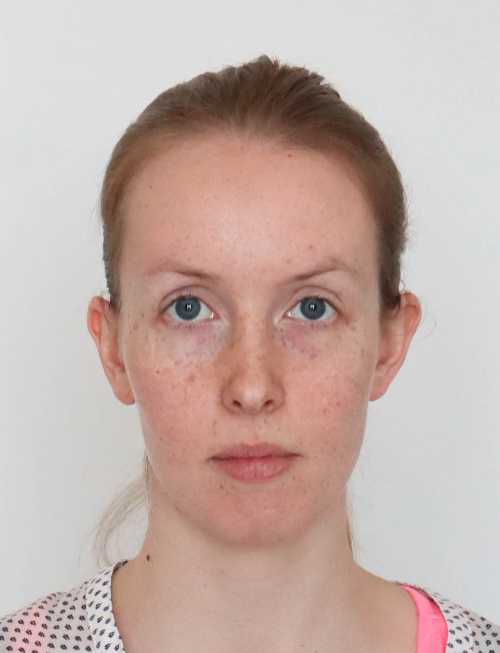
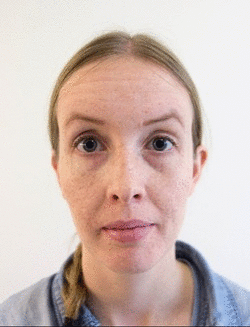
In the animation, you see three photos taken with the same camera and the same focal length. The individual photos were taken from different distances. I have cropped the images so that the face is the same size in each frame.
We see there’s a different amount of distortion in the three photos. Everything else is equal, except for the distance the photos were taken. Short distance causes more distortion.
Side note: If you’re not familiar with the term focal length, consider it a certain amount of zoom. A 50 mm or greater focal length is suitable for portrait photography. A 50 mm lens (or photographic objective) means the lens has a focal length of 50 mm. If the camera’s base focal length is 20 mm, then 2x zoom would mean a focal length of 40 mm (2 * 20 mm = 40 mm), and so on.
An often-repeated myth is that wide-angle lenses cause lens distortion. A wide angle means a small focal length. (A fisheye lens is an ultra wide-angle lens.) According to the myth, all photographs with wide-angle lenses have distorted proportions. This is incorrect. The distortion is only caused by the distance between the lens and the subject.
A typical smartphone main camera has a quite wide lens, but you can still take good passport photos without distortion. Shooting distance is key.
At the end of this section, I’ll explain why this has become a myth, but first, we will learn the facts.
If you’re not interested in the technical details, skip the next section and the examples.
Why distance matters?
When your camera is too close to your face, different facial features appear at drastically different distances from the lens. For example:
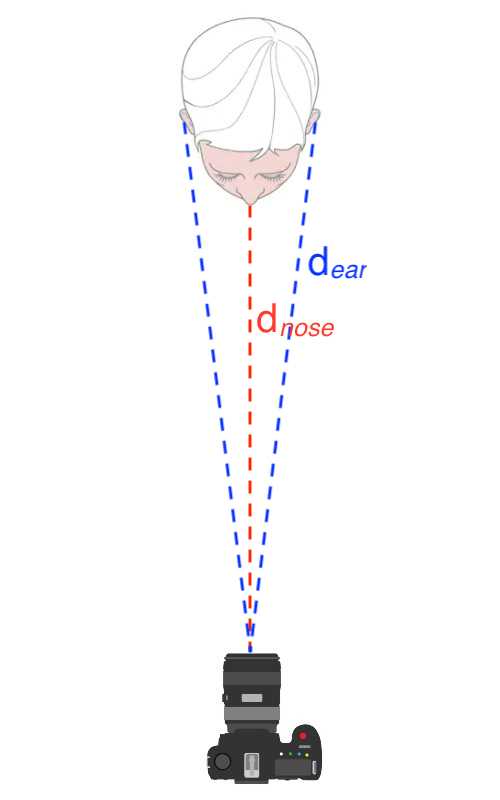
dear: 58.3 cm (23.0 inches)
Difference: 16 %
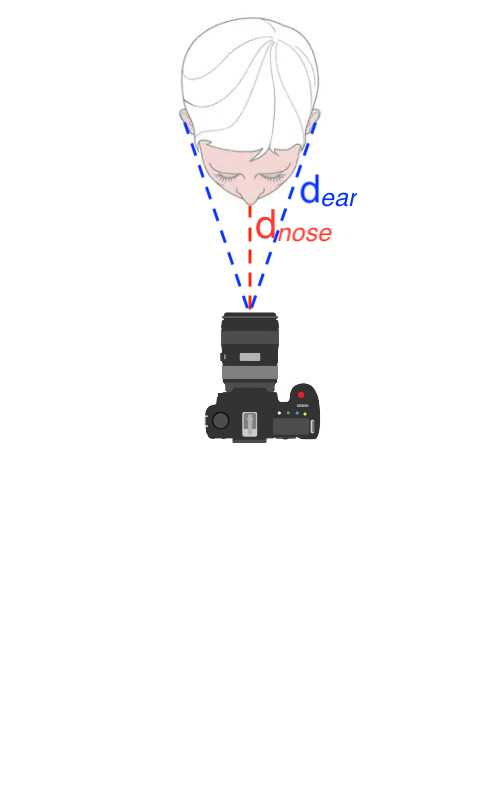
dear: 37.5 cm (14.8 inches)
Difference: 87.5 %
This distance disparity causes closer features (like your nose) to appear disproportionately large compared to more distant features (like your ears).
Think of the red and blue dashed lines as example paths of light traveling from the face to the camera.
If the nose is 20 cm (7.9 inches) from the lens, the ears are 37.5 cm (14.8 inches) away, a difference of 87.5 %. If the lens is 50 cm (19.7 inches) from the nose, the distance between the lens and the ears is 58.3 cm (23.0 inches). There’s only a difference of 16 % this time.
When the camera is far away from the face, the ears and the nose are almost the same distance from the camera.
If the camera is close to the face, the distance to the ears is almost double the distance to the nose!
If something is closer to the camera, it seems more prominent in the photo. If the camera is near the face, the nose is enormous compared to the ears because it is 87.5% closer to the camera.
Also, in the figure on the right, the blue lines to the ears almost touch the cheeks. This is why the ears are barely visible when a photo is taken close to the face.
Fun fact: The above-described effect is known as Dolly Zoom or Vertigo Effect in film-making. To learn more, watch a fun and informative YouTube video about it: The Dolly Zoom: More Than A Cheap Trick by Now You See It.
What is the recommended distance to take a passport photo?
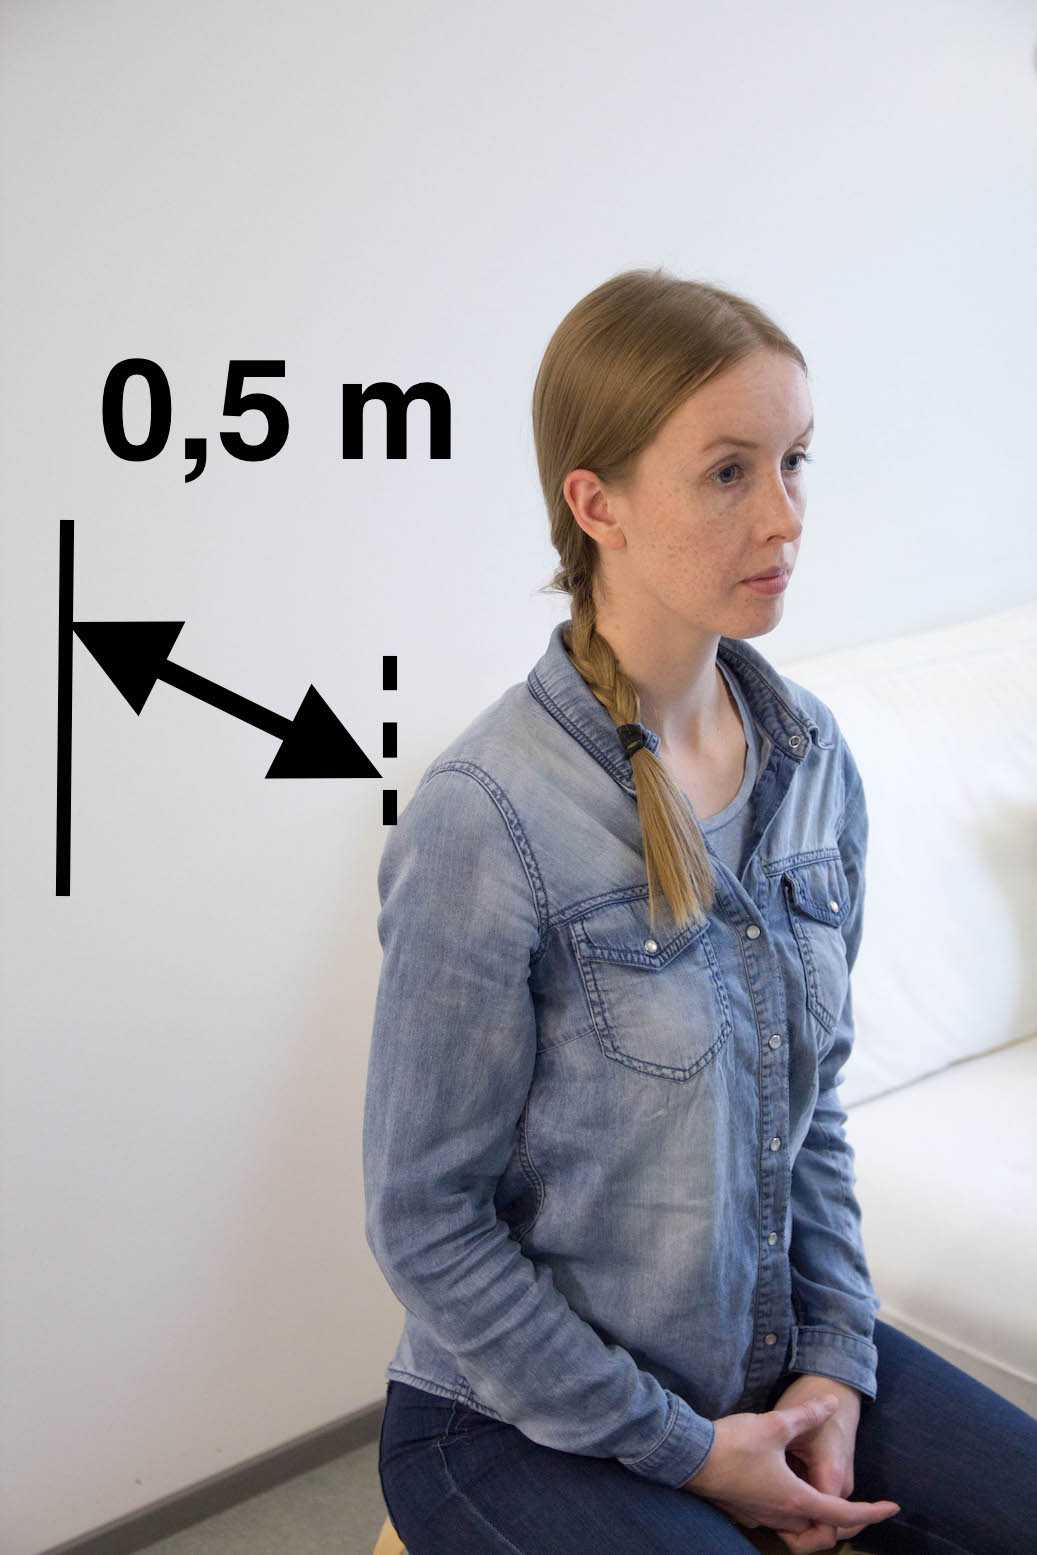
The greater the distance, the less distorted the photograph is. For example, 3 meters (10 feet) is so far that you can’t detect distortion. Less than 3 meters (10 feet) is ok if you don’t go too close. A typical selfie distance (a little less than arm’s length) is too short if you want to avoid distortion.
I recommend using a minimum distance of 1 meter (3 feet). Use a greater distance if you can. The limiting factor is the image quality of the cropped end result.
Let’s take a look at some concrete examples.
Example photos with a 50 mm lens
Compare the three photographs taken from different distances with 50 mm focal length.
(Info for photography enthusiasts: All example photos were shot with a camera with an APS-C crop sensor.)
The photos are cropped so that the subject is the same size in all photographs.
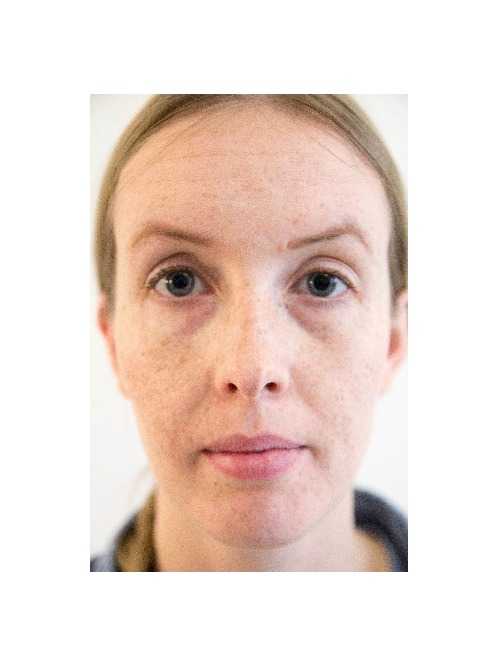
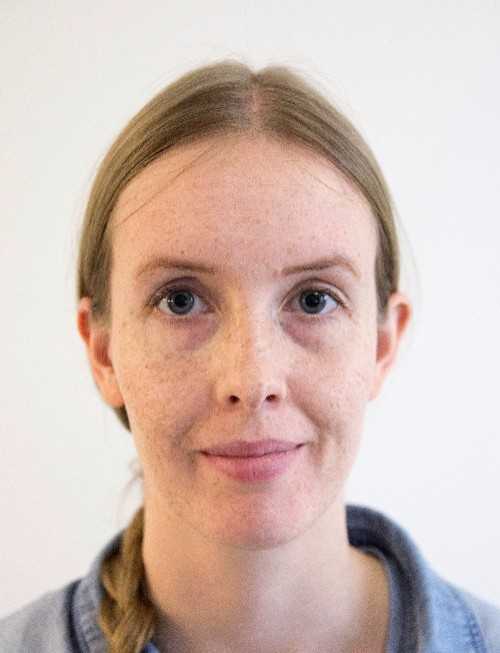
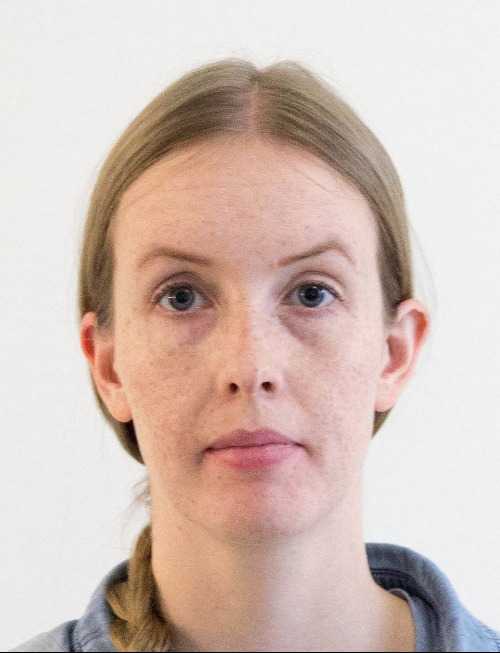
- 50 mm lens, 30 cm (1 ft) distance. The first image is cropped tighter than the others. The reason is that a 50 mm lens this close to the subject doesn’t produce wider images (i.e., the image is not cropped at all because there was not enough of it). Notice how the ears of our subject are almost not visible.
- 50 mm lens, 1 m (3 ft) distance. The second photo looks already quite good and natural. Still, however, our subject’s nose appears more prominent than it really is.
- 50 mm lens, 2 m (7 ft) distance. The last photo seems to be flatter than the others because, the subject’s nose is not overly pronounced. From these three photos, this is the closest to reality.
The subject’s smile is the best in the second photo of these three. Nevertheless, try to look past the facial expression when judging the distortion!
Example photos with a 17 mm lens

Compare the three photographs taken from different distances with a 17 mm focal length. A 17 mm lens is close to a typical lens found in a smartphone. The photos are cropped so that the subject is the same size in all photographs.
- 17 mm lens, 30 cm (1 ft) distance. Noticeably distorted.
- 17 mm lens, 1 m (3 ft) distance. Less distorted.
- 17 mm lens, 2 m (7 ft) distance. No visible distortion. Remember that the photo had to be cropped so much that the image quality has notably decreased.
Compare the 17 mm lens examples to the 50 mm lens examples above. When the distance is the same, the photos look the same (after cropping).
Comparison: same distance, 50 mm vs. 17 mm lens (cropped to the same size)
Above is a side-by-side comparison of the middle-distance photos from the earlier example.
The first one is shot from a 1 m (3 ft) distance with a 17 mm lens.
The second is shot from the same distance with a 50 mm lens.
Even though the focal lengths are different, there is no difference in distortion because the distance is the same. For example, the ears look identical in both photos. If a wider lens caused more distortion, we’d see a difference in this comparison.
Common misconceptions about lens distortion
Many people believe wide-angle lenses inherently cause distortion. This is a myth. The distortion comes from shooting distance, not lens type. While wide-angle lenses often lead photographers to stand closer to their subjects (thus causing distortion), the lens itself isn’t the problem.
Luckily, even if you’re stuck with a wide lens, you don’t have to get close to the subject. Take the photograph from a long enough distance. Then, crop the picture; for example, you can use our passport photo editor to crop. You’ll lose pixels, but ID photos are required to be small anyway. Losing the pixels might not cause any harm to the end result.
Note that a non-wide (for example, 50 mm or 85 mm) lens is, of course, better for portraits than a wide lens. It allows you to shoot from a long enough distance without the need to crop the photo considerably.
The earlier-mentioned lens distortion is also a real effect. It’s a mild effect and causes a different kind of distortion than the distortion caused by a short distance. Lens distortion is a lens-specific effect (i.e., it’s not the same on every lens, unlike the distance distortion). In practice, you don’t need to worry about this type of distortion when taking passport photos.
If you want to learn more about the subject, I recommend this excellent in-depth post: Face Distortion is Not Due to Lens Distortion.
A distorted selfie-style passport photo can lead to unwanted stops at airports
In 2026, passport control is partly automated in some airports. The machine compares the subject’s face to the photograph on the passport. The face comparison works by measuring relative distances between facial features (e.g., center of the eye, tip of the nose). If the passport photograph is distorted, the automated check can fail.

Of course, an automated check isn’t your only worry if your passport photo is distorted. Distortion also affects humans’ ability to compare the photograph to the real face.
4 lighting tips for total photography beginners
It doesn’t matter how good your camera is; you can’t take a good photograph in bad lighting.
What is bad lighting? Bad lighting is not having enough light. Bad lighting is also direct, i.e., hard light in the passport photo context. Hard light creates pronounced shadows with clear borders.
The good news is that setting up lighting isn’t rocket science that only professionals can do.
In fact, you don’t need anything you don’t already have available.
No artificial light beats the sun, so take advantage of it.
As a rule of thumb, daylight on a cloudy day (around midday) is near-optimal. It’s diffused (soft) and white, and there’s enough light.
Here are some tips.
1. You have to have enough light (preferably daylight)
Cameras produce better pictures when they receive more light to the sensor. Regular ceiling lights on a dark evening aren’t enough for a good result. Your eye adjusts better than a camera. Even if there’s enough light for you, there can be too little for a camera.
If you can’t get sunlight in, wait until you can. If you can’t wait, put on all possible lights and use flash.
The color temperature of daylight is better than average ceiling lights. Daylight, excluding early mornings and late evenings, is white (around 5500 Kelvins). Typical home indoor lights are yellow or “soft white” (around 2800 Kelvins). Kelvin is the unit used to describe color temperature.
If you have daylight available, try using it as your only light. If the subject is unevenly lit or has too hard shadows, try filling this unevenness with a lamp or flash.
What does filling mean? Let’s say that daylight through a window illuminates the subject from the left side. As a result, the right side of the subject is darker than the left. You can fix this by pointing a light at the subject from the right side. Thus, you fill in the darker spots with additional light.
Before thinking about filling, read the next tip on how to avoid needing it.
2. Turn the subject’s face towards the source of light
Make sure the subject is evenly lit. In a home setting, it is often easier to move and turn the subject than the light source. For example, if your primary light source is a window, the subject should turn towards the window. Otherwise, the other side of the subject’s face will get more light, and there will be a shadow on the other side.
3. Diffuse the light
Don’t use direct sunlight or point a table lamp directly at the subject’s face like in an interrogation. Instead, direct the lamp towards a wall or a ceiling to bounce and diffuse the light. Diffused light doesn’t create hard shadows. Optional: Instead of buying a softbox, put a piece of white paper or cloth in front of the lamp.
The same applies to using a flash. Try holding a clean piece of white printing paper about 20 cm (8 inches) from the flash to diffuse the light. Suppose you can’t direct the flash independently. In that case, you can use a small mirror to direct the flash towards the ceiling instead of the subject. However, this can be hard to achieve if the flash and the lens are close to each other. On a smartphone, the flash and the lens can be only millimeters away from each other, so applying these tips can be difficult.
Even though sunlight is recommended, avoid direct sunlight. Sunlight is non-direct on a cloudy day or when the sun doesn’t shine directly in through the windows. If the sun shines directly through your windows, consider closing the curtains because they let some light through.
4. Try different settings and positions
Try different combinations of light sources, moving your subject around to find the best spot, and shooting at different times of the day. Even the pros must do trial and error. If you can use flash, try taking a photo with and without it and see which one is better.
How to get an even background without shadows
The background of a passport photograph must be light-colored and even. Some countries require a completely white background. Use a wall, a door, or a bedsheet.
The subject should be at least half a meter (1-2 feet) from the background. The distance helps you avoid creating shadows between the subject and the background. Distance also allows you to get some blur effect (bokeh) on the background when you focus on the subject.
The subject doesn’t have to sit in a chair. They can also stand or sit on the floor. For example, if the subject is sitting on the floor, you can create a background by placing a bedsheet on the back of a couple of chairs. If the subject is sitting in a chair, the background would have to be higher, which could be more complicated to set up.
If you must choose between two places, one with good lighting and another with a good background, always choose the good lighting. Background problems can often be fixed with photo editing.
Passport Photo Lab editor includes a background replacement tool that helps if the background in your photo isn’t even. The background replacement works automatically and replaces the background with a solid color according to the selected passport photo standard. Automatic background removal works best when the background right around the subject’s edges, especially hair, is even and close to the final color. In practice, this feature makes taking a passport photo at home significantly easier because you don’t need to arrange a perfect solid-colored background.
Get the correct 90° angle with a tripod, DIY stand, or by leaning forward
Place the camera at the same height as the subject’s face. If you don’t have a tripod or a friend to take the photo, chairs, tables, ladders, etc., are good alternatives.
If the phone or the camera slides, place a towel on top of the surface to add friction.
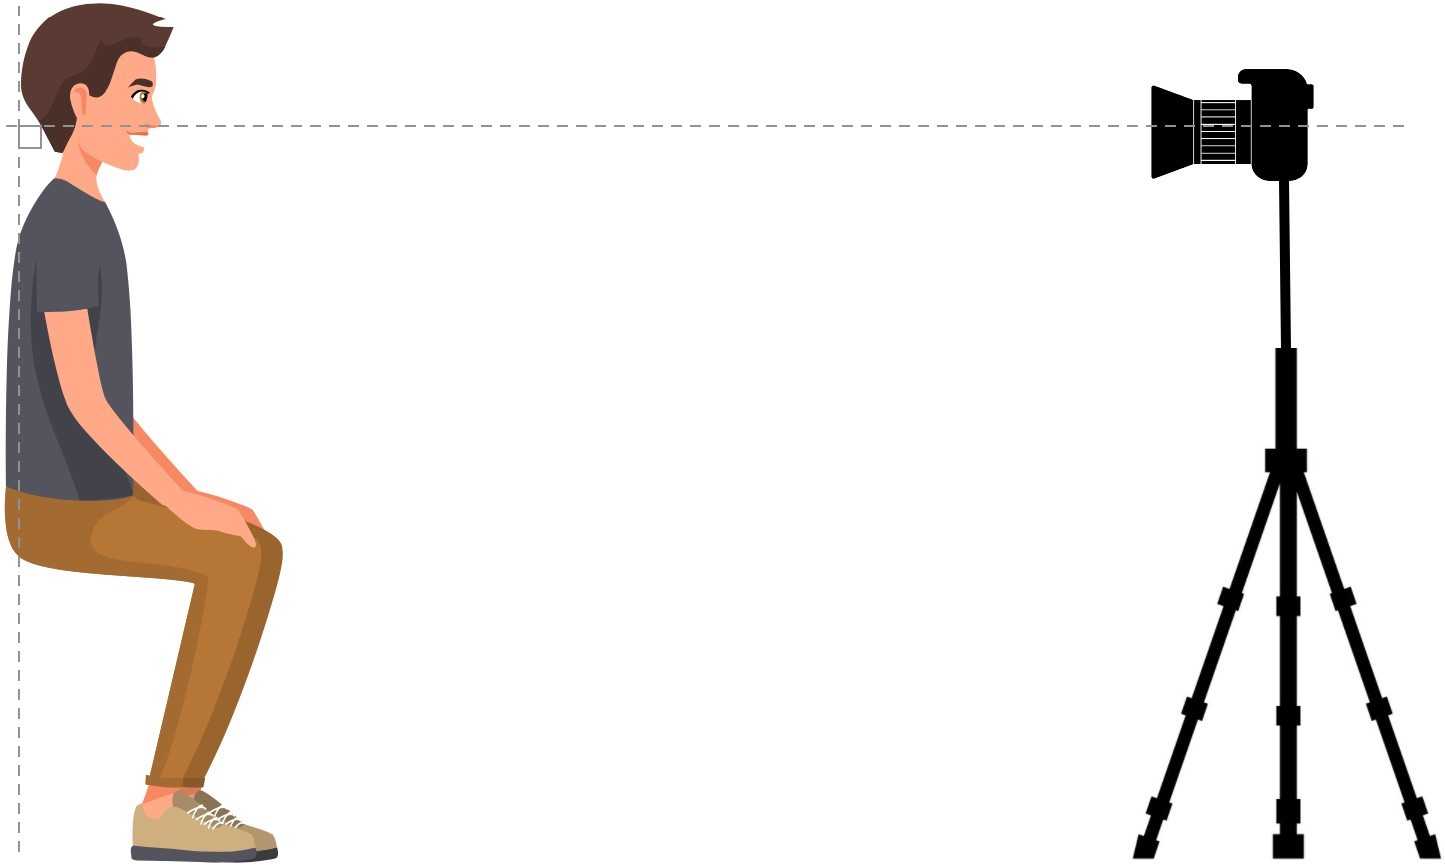
Make sure the camera is pointing toward the subject at the correct angle! Finding a high enough surface for the camera can be surprisingly tricky if the subject is sitting in a chair. It must be at the same height as the subject’s eyes.
A line from the camera to the subject’s face and a line parallel to the subject’s back must meet at a 90° angle. This is what I mean by the “correct angle.” It’s a fancy way of saying the camera must be at the same height as the subject’s face. Except it doesn’t!
Photo hack: The angle between the subject and the camera is the only thing that matters. If the typical setup is hard to achieve, think outside the box. For example, the subject can sit on the floor, so you can have the camera lower as well.
You can also place the camera on the floor and ask the subject to lean forward. Make sure that the angle matches the standard setup.

To reinforce the point, here’s another example: You could even lie on your back and tape the camera to the ceiling, pointing downwards. In fact, you can use this setup with babies! Of course, a parent would hold the camera.
Avoid blurred photos by using a focus placeholder
If you’re taking your photo alone, getting the focus right can be tricky. It’s hard to focus on something, in this case, your face, when it’s not yet in front of the camera.
When you’re setting up the timer, pre-focus the camera on the chair you’ll sit on. Do not pre-focus on the background, as it’s farther away from the camera than you will be.
Autofocus on cameras usually works best when the object has clear borders. Try to place a dark item where you will be sitting. Pre-focus the camera on the object. Set the timer, run to the chair, throw the object away, and sit down.

Why do objects with clear borders work best? The autofocus algorithm works by trying to minimize the blur in the area of focus. In other words, it tries to maximize the color difference between neighboring pixels. A sharp contrast, such as a black bottle on a white background, helps the algorithm find focus. Some expensive cameras have separate sensors for measuring distance, but the above holds true for most cameras and smartphones.
Some cameras can autofocus on a face even when the timer is used. The camera will automatically focus after the countdown. Take advantage of this feature if it’s available!
Can I use a smartphone to take a passport photo?
Yes! Almost all smartphones today are suitable for taking passport photos. Your phone doesn’t have to be the most recent model. If it can take good-quality portraits, it can also take good-quality passport photos.
Tablets, including iPads, are also suitable for taking passport photos.
Passport photos are small. This makes them forgiving when it comes to camera sensor quality and sharpness. Although smartphone cameras are improving, their quality doesn’t match DSLR cameras. Luckily, you don’t need DSLR-level quality.
There are some things to keep in mind if you plan to take a passport photo with your phone. The most important ones are listed below.
Use the default camera app
You don’t need a specific passport photo app. Take a portrait first and edit it later to fit the passport photo specifications. Our online editor works great with a smartphone.
Some passport photo apps require you to align the photo perfectly while taking it. I don’t recommend using such apps. Alignment is hard to get right at this phase if you want to get everything else right simultaneously. It’s better to focus first on just taking a good portrait. You can edit, align, and crop the photo later. Most importantly, these apps can force you to take the picture from a non-optimal distance, causing distortion.
You can select portrait mode when taking a passport photo with a smartphone, but normal photo mode works well too.
Keep a distance of 1 meter (3 feet) or more
Generally, wide-angle lenses are not optimal for taking passport photos. They can be used, but you must pay extra attention to keeping a distance of at least 1 meter (3 feet) from the subject! You must keep the distance even if the subject seems small and doesn’t fill the frame. Otherwise, the subject’s face will get distorted.
If you already didn’t, read the first sub-section to learn more.
If your smartphone has one camera lens on the back, it’s almost always a wide-angle lens. In 2026, more smartphones have many lenses with different focal lengths. If your camera has a “telephoto” lens (which allows you to take photos of faraway objects), use it. Otherwise, the default lens is fine.
The telephoto lens is typically automatically selected when you select portrait mode. It is also typically selected in normal photo mode when you use 2x or greater zoom.
Camera settings for a passport photo - use zoom wisely
Your camera’s default mode is fine. However, if your camera has a portrait mode, use it.
Use the timer option if you’re taking the photo by yourself.
Don’t try to take a selfie, and don’t take the photo via a mirror. The distance is not long enough in a selfie. Additionally, it’s impossible to take a photo with a mirror without the camera getting in the picture while maintaining the correct angle.

Check that you don’t have any automatic filters or face retouching on.
If you have optical zoom, use it. Zoom in so that the subject’s face fills the frame when the photo is taken from a long enough distance. Leave room for later cropping. You can crop afterward but can’t add more to the photo. You can’t align everything perfectly while taking the photo. The passport photo specifications are too strict for that. You’ll have to crop the photo later anyway.
A common mistake is to align the photo with the camera so tightly that there isn’t enough background visible over the subject’s head.
If you have digital zoom (typical zoom on a smartphone), you can use it, but you don’t have to. You get the same result by cropping later. Digital zoom is effectively just cropping.
If you’re unsure if your zoom is digital or optical, it’s better to use the zoom as suggested for optical zoom.
Always place the subject in the center of the photo when taking the photograph! You can crop the picture to be strictly correct, but subjects closer to the sides of the frame can have distortions.
Cropping, aligning, and editing a passport photo
Passport photos have strict size and proportion specifications that you must follow. Check the specifications from your local authority.
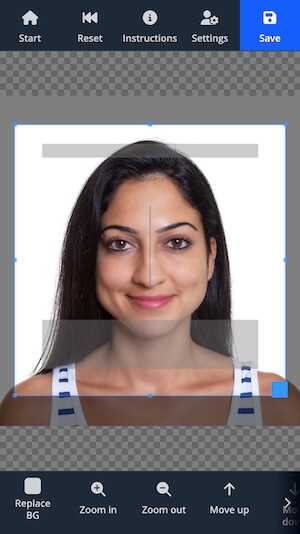
Whether you need a photo file with an exact pixel size or need to print a photo with a specific physical size, you can use Passport Photo Lab tool. The tool works online on your browser with all devices, including mobile devices.
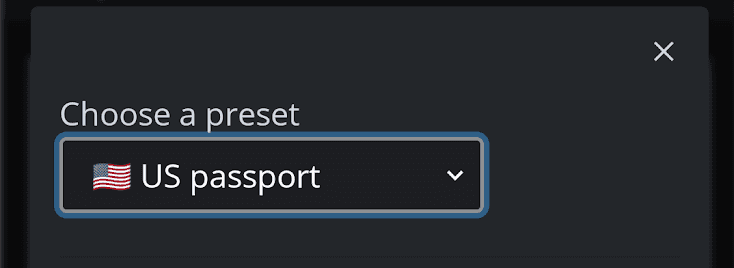
Passport Photo Lab has built-in helpers for typical size specifications. You can also freely enter any size and alignment specifications you want.
It’s beneficial to concentrate on taking a good photo first. Then, take care of the alignment and size of the photo.
Printing a passport photo at home vs. ordering a print
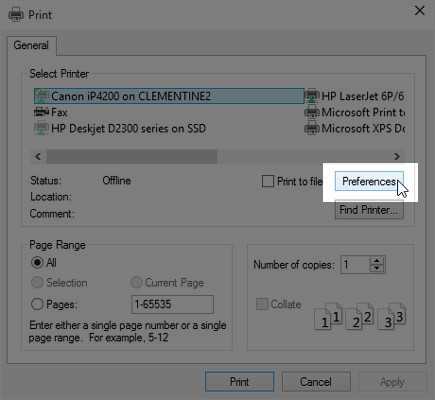
If you print the photo at home, consider using photo paper. Paper quality plays a significant role in the result. Also, check the print settings and select the best quality possible. Standard settings usually compromise quality, printing speed, and ink consumption.
Emily has written excellent tips to get a great quality print at home on The Graphics Fairy. Make sure to check it out!
If you need a printed photo but don’t have a suitable printer, you can still take the picture yourself at home. Take a photo, crop it to the right size, and finally, order a printed version from your favorite photo-printing service.
If you live in the U.S., check this photo printing service comparison from PC Magazine.
Passport Photo Lab tool always takes care of the image file metadata. The photo will get printed to the correct size. Make sure you don’t select any printing options to stretch or shrink the image. Read more about print settings, which especially Windows users and those ordering from a printing service should take into account.
Why take a passport photo yourself?
It’s worth it to consider your options.
Pros:
- Save money.
- You can save time by taking it at home.
- You can take your time and take as many photos as needed until you get the desired result. This reduces the risk of having an ID photo where you look horrible. Photo services can advertise that they will retake the photo until you’re satisfied. However, think about the situation. How many times do you feel comfortable asking them to retake the photo? Probably less times than you would try at home.
Cons:
- Taking the photo at a booth or studio near your usual daily route can be more convenient.
- It might not be worth the money saved if you must spend a lot of time setting things up at home.
Are you worried about whether your self-taken photo will get accepted?
Requirements for an ID photo can be divided into three categories:
- Facial expression, posture, etc.
- Studio setup, such as lighting and background (this doesn’t have to be as professional as it sounds).
- Post-processing: editing, cropping, and printing the photo.
The most important rules for ID photos consider facial expression and posture. You can meet these rules at home as well as anywhere else.
The most complex parts are the technical aspects.
For the home studio setup, you have this complete guide.
Editing the photo can be challenging if you’re not familiar with photo editing software. You need to edit the picture to the correct size, either for print or for online submission, and the face must be precisely the right size in the photo.
We have published an easy-to-use online ID photo editor. You can use the editor without editing experience, but many professionals also use it.
That’s all three requirements tackled!
Bonus: tips for taking a passport photo of a baby or a toddler
Lay your baby on their back on a white or light-colored sheet. Take the photo from above. Be careful to select the place and the lighting so there aren’t shadows on the baby’s face.
Another option is to use a car seat. Cover it with a white or light-colored sheet. The seat will help support your baby’s head while you take the photo.
Olivia Frost has written a great post about how to take baby passport photos at Tots to Travel. Check it out if you’re taking a DIY baby passport photo!
Conclusion
Although this article is long, taking an ID photo at home is simple. You don’t even need any professional equipment.
Taking the photo yourself isn’t always the best choice, but it can save you time and money.
Surprisingly, taking a passport photo at home often results in a better picture than you could get elsewhere. Even if your equipment isn’t studio-quality, you can compensate for it. You can fine-tune and retake the photo until you are satisfied. Remember, you’re stuck with the picture for years! A couple of extra minutes while taking the photo is totally worth it.
The hardest part of ID photography at home is the setup. I recommend that you:
- Wait for the next sunny day to take advantage of the natural light
- Shoot from a minimum of at least 1-meter (3 feet) distance
You can edit and crop the photo to meet passport standards with your favorite editor. One option is to use our passport photo editor app. There’s a demo photo if you want to try it. No registration is needed.
My most essential tip, which applies to any photography, is to try different things and take several photos from which you can pick the best one.


